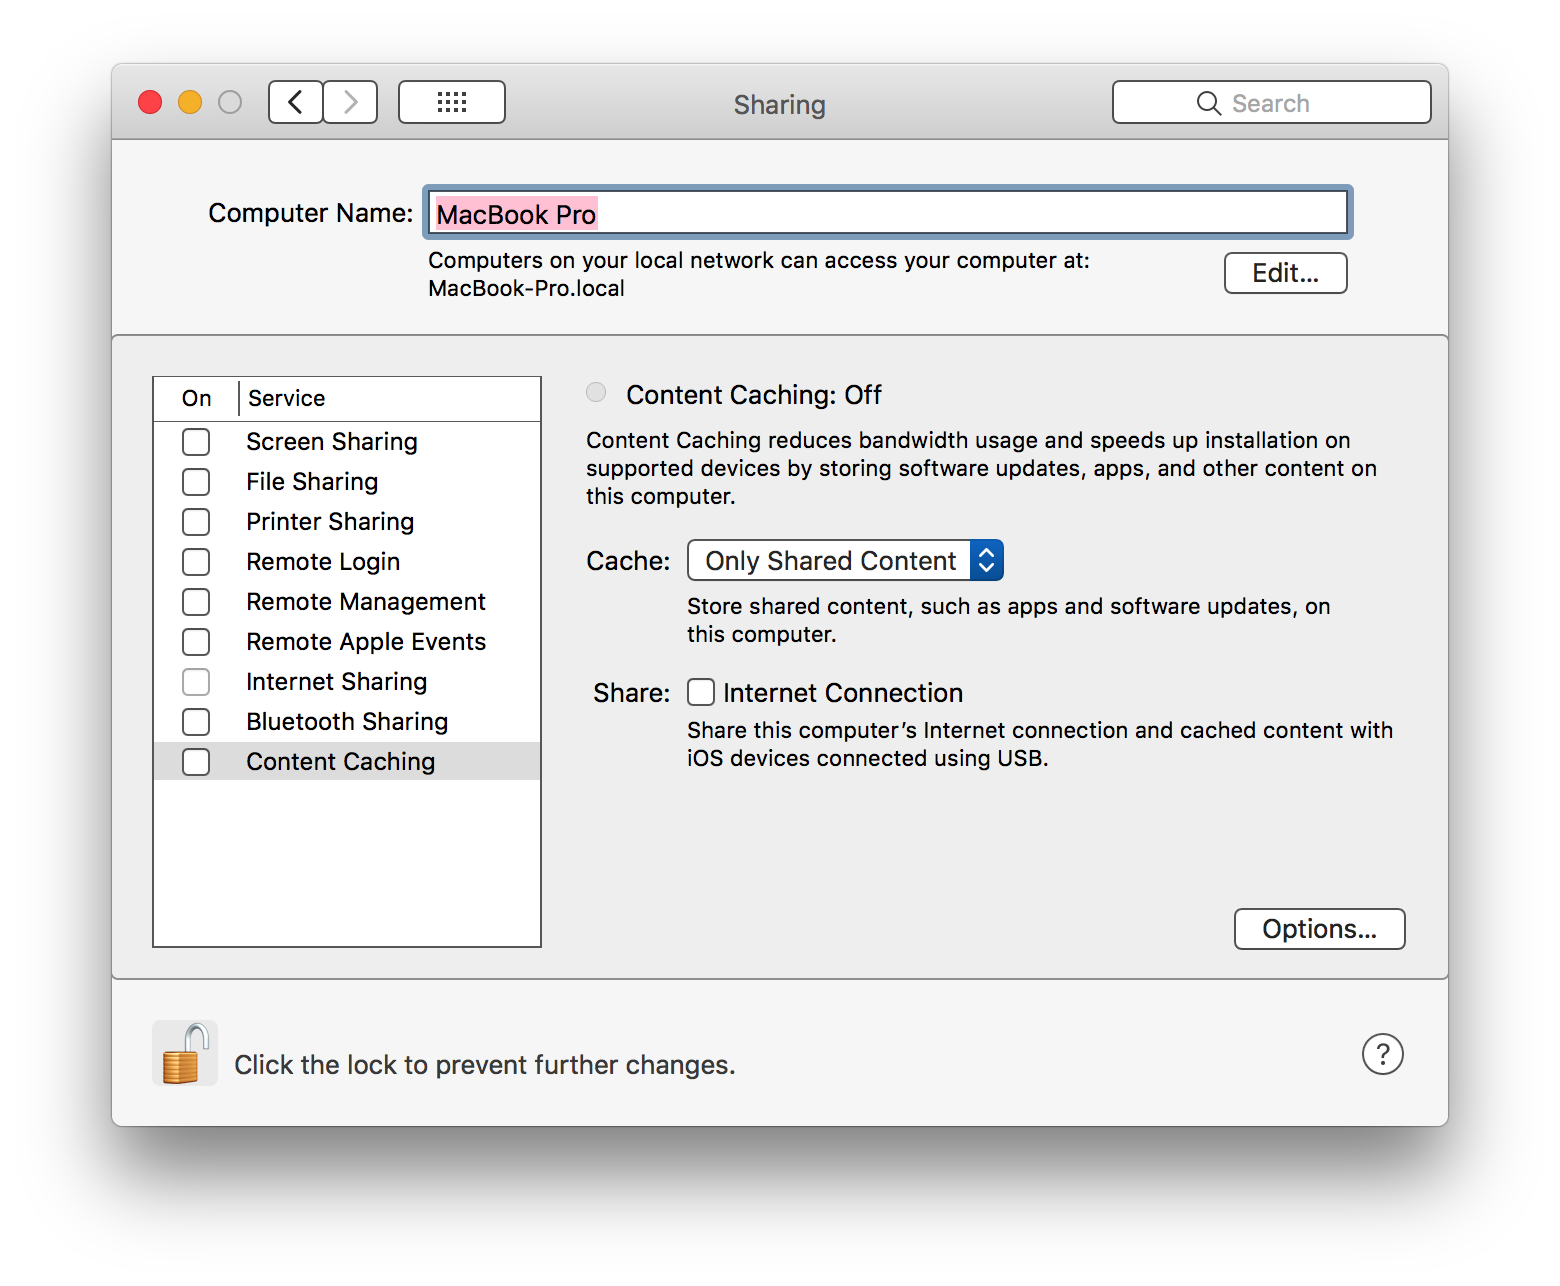
Content Caching (built into macOS High Sierra) is an oft ignored feature that can speed up delivery of Apple software updates, iOS apps, well as personal iCloud data for homes, businesses, and institutions by delivering content from local computer storage over the LAN, rather than going out to the Internet each and every time.
Content Caching dramatically speeds up app installs if you are doing multiple app installs. As your devices download apps, the Mac inserts itself as middleman and will save copies of each installed app. Subsequent installs of the same apps are much quicker, since the apps load from the Mac’s hard drive instead of the Internet. This is extremely useful for deploying a large number of devices and will save a lot of external bandwidth!
To enable it on macOS High Sierra (10.13.x), all you need is to go into System Preferences > Sharing and check the Content Caching check box.
There are three options for caching:
Shared Content - this limits caching to apps, and software updates.
iCloud Content - this caches personal iCloud (stored securely) only, such as iCloud Drive, and iCloud Photos.
All content - use this to cache both Shared and iCloud content.
We recommend a machine that is permanently in the office with at least 50GB storage and wired into Ethernet to choose as the Content Caching server. It’ll take a small performance hit, but in return, the rest of the office will benefit from the speed increase in app downloads and updates.
Content Caching saves our bacon during our mass event deployments. 🐷📲
The age old proverb, “A chain is only as strong as its weakest link”, certainly applies to network security. With so much attention spent on encryption, securing user endpoints, anti-phising software, can you remember the last time you changed your office WiFi password? And come to think of it, how many staff members have joined and left since then, not to mention your various guests and clients that might have joined your network during meetings and visits etc.
Ideally, one would change the password on a regular basis; and especially after a member of staff leaves the company. However, the reality is that is this far to impractical and labour intensive. And here at LeftBrain, we prefer to work smarter, not harder.
This is where RADIUS comes in (As industry acronyms go, this one isn’t bad). Wikipedia defines it as: Remote Authentication Dial-in User Service. Put simply, it’s a protocol designed to provide centralised network authentication of your users.
How does this help network security?
Let’s imagine every staff member has their own unique WiFi password to join the company network. Now, not only can you account for when (and where) a user joins your network (this is useful for auditing and a host of all other benefits), when they leave, you can deauthenticate their specific credentials without affecting the rest of the office. RADIUS allows you to do this. Since most companies already create user accounts to access an on-premise server, or cloud storage accounts (Microsoft’s ActiveDirectory being one of the most popular), RADIUS can automagically use these accounts for authentication to the network.
This sounds complicated and expensive.
It can be, but it also doesn’t have to be. We’ve helped our clients roll out RAIDUS authentication with very little additional investment, more often than not, the equipment and software required is already built into the existing network infrastructure (one of the perks of having your IT support partners handle everything). Once setup, everything works like normal WiFi. In fact, it’s completely transparent to the end user as all macOS and iOS devices support RADIUS and will auto join the network.
Within the UniFi controller, enabling RADIUS is as simple as turning it on and defining an authentication server.
For a typical office, we’ll normally deploy three wireless networks:
The main company WiFi. This can only be logged on via RADIUS authentication. Access to company data is only available via this network.
Infrastructure WiFi. Can be a hidden SSID, but protected by WPA2 Passcode. This is reserved for WiFi devices used in and around the office, such as the office Sonos or wireless printer. Only administrators or senior management should know this password.
Guest WiFi. A segregated, restricted network.
Now when a staff member is off-boarded, their user account is normally archived and disabled. With RADIUS implemented, their WiFi access will also be revoked at the same time, this closing off the loop.
For more information and to see how we can implement RADIUS (and tighten up your network security), get in touch.
Apple has officially discontinued the production of their AirPort devices. AirPort Express, Extreme and Time Capsules. This has come as no surprise as they have been relatively stagnant in this area for quite some time.
Apple first introduced the Airport Base Station back in 1999. Since then, the company made incredibly reliable, easy to configure WiFi base stations and routers - making it easy and accessible to the masses to have WiFi in their own homes and offices.
Today, as WiFi has become ubiquitous and critical to nearly all businesses and homes, demand, and expectation for fast, reliable WiFi is higher than ever, even the smallest of dead spots can cause downtime, drops in productivity, and hair pulling frustration. The days of the single router / access point is over.
At Leftbrain we have long been deploying controller-based WiFi systems, based on Cisco Meraki and UniFi platforms to our clients.
A cloud based controller allows the ability to centrally manage the wireless network either on site, or remotely. Advantages of these systems also include;
Propagation of all settings to all devices within seconds.
Rolling upgrades, all devices need updates at some point for security or functionality purposes, with a rolling upgrade this means that only one device will update at a time allowing for the network to remain accessible.
Roaming from one access point to another, the seamless handoff from one WiFi access point to another when a better signal is available, just like your mobile phone.
Added security through filters, rules, multiple SSIDs and also with RADIUS (more on this later!),
If you’re still using Airport Extremes, or Apple Time Capsules, and would like to see how much faster you can push your WiFi, get in touch to book in your free business WiFi assessment and survey.
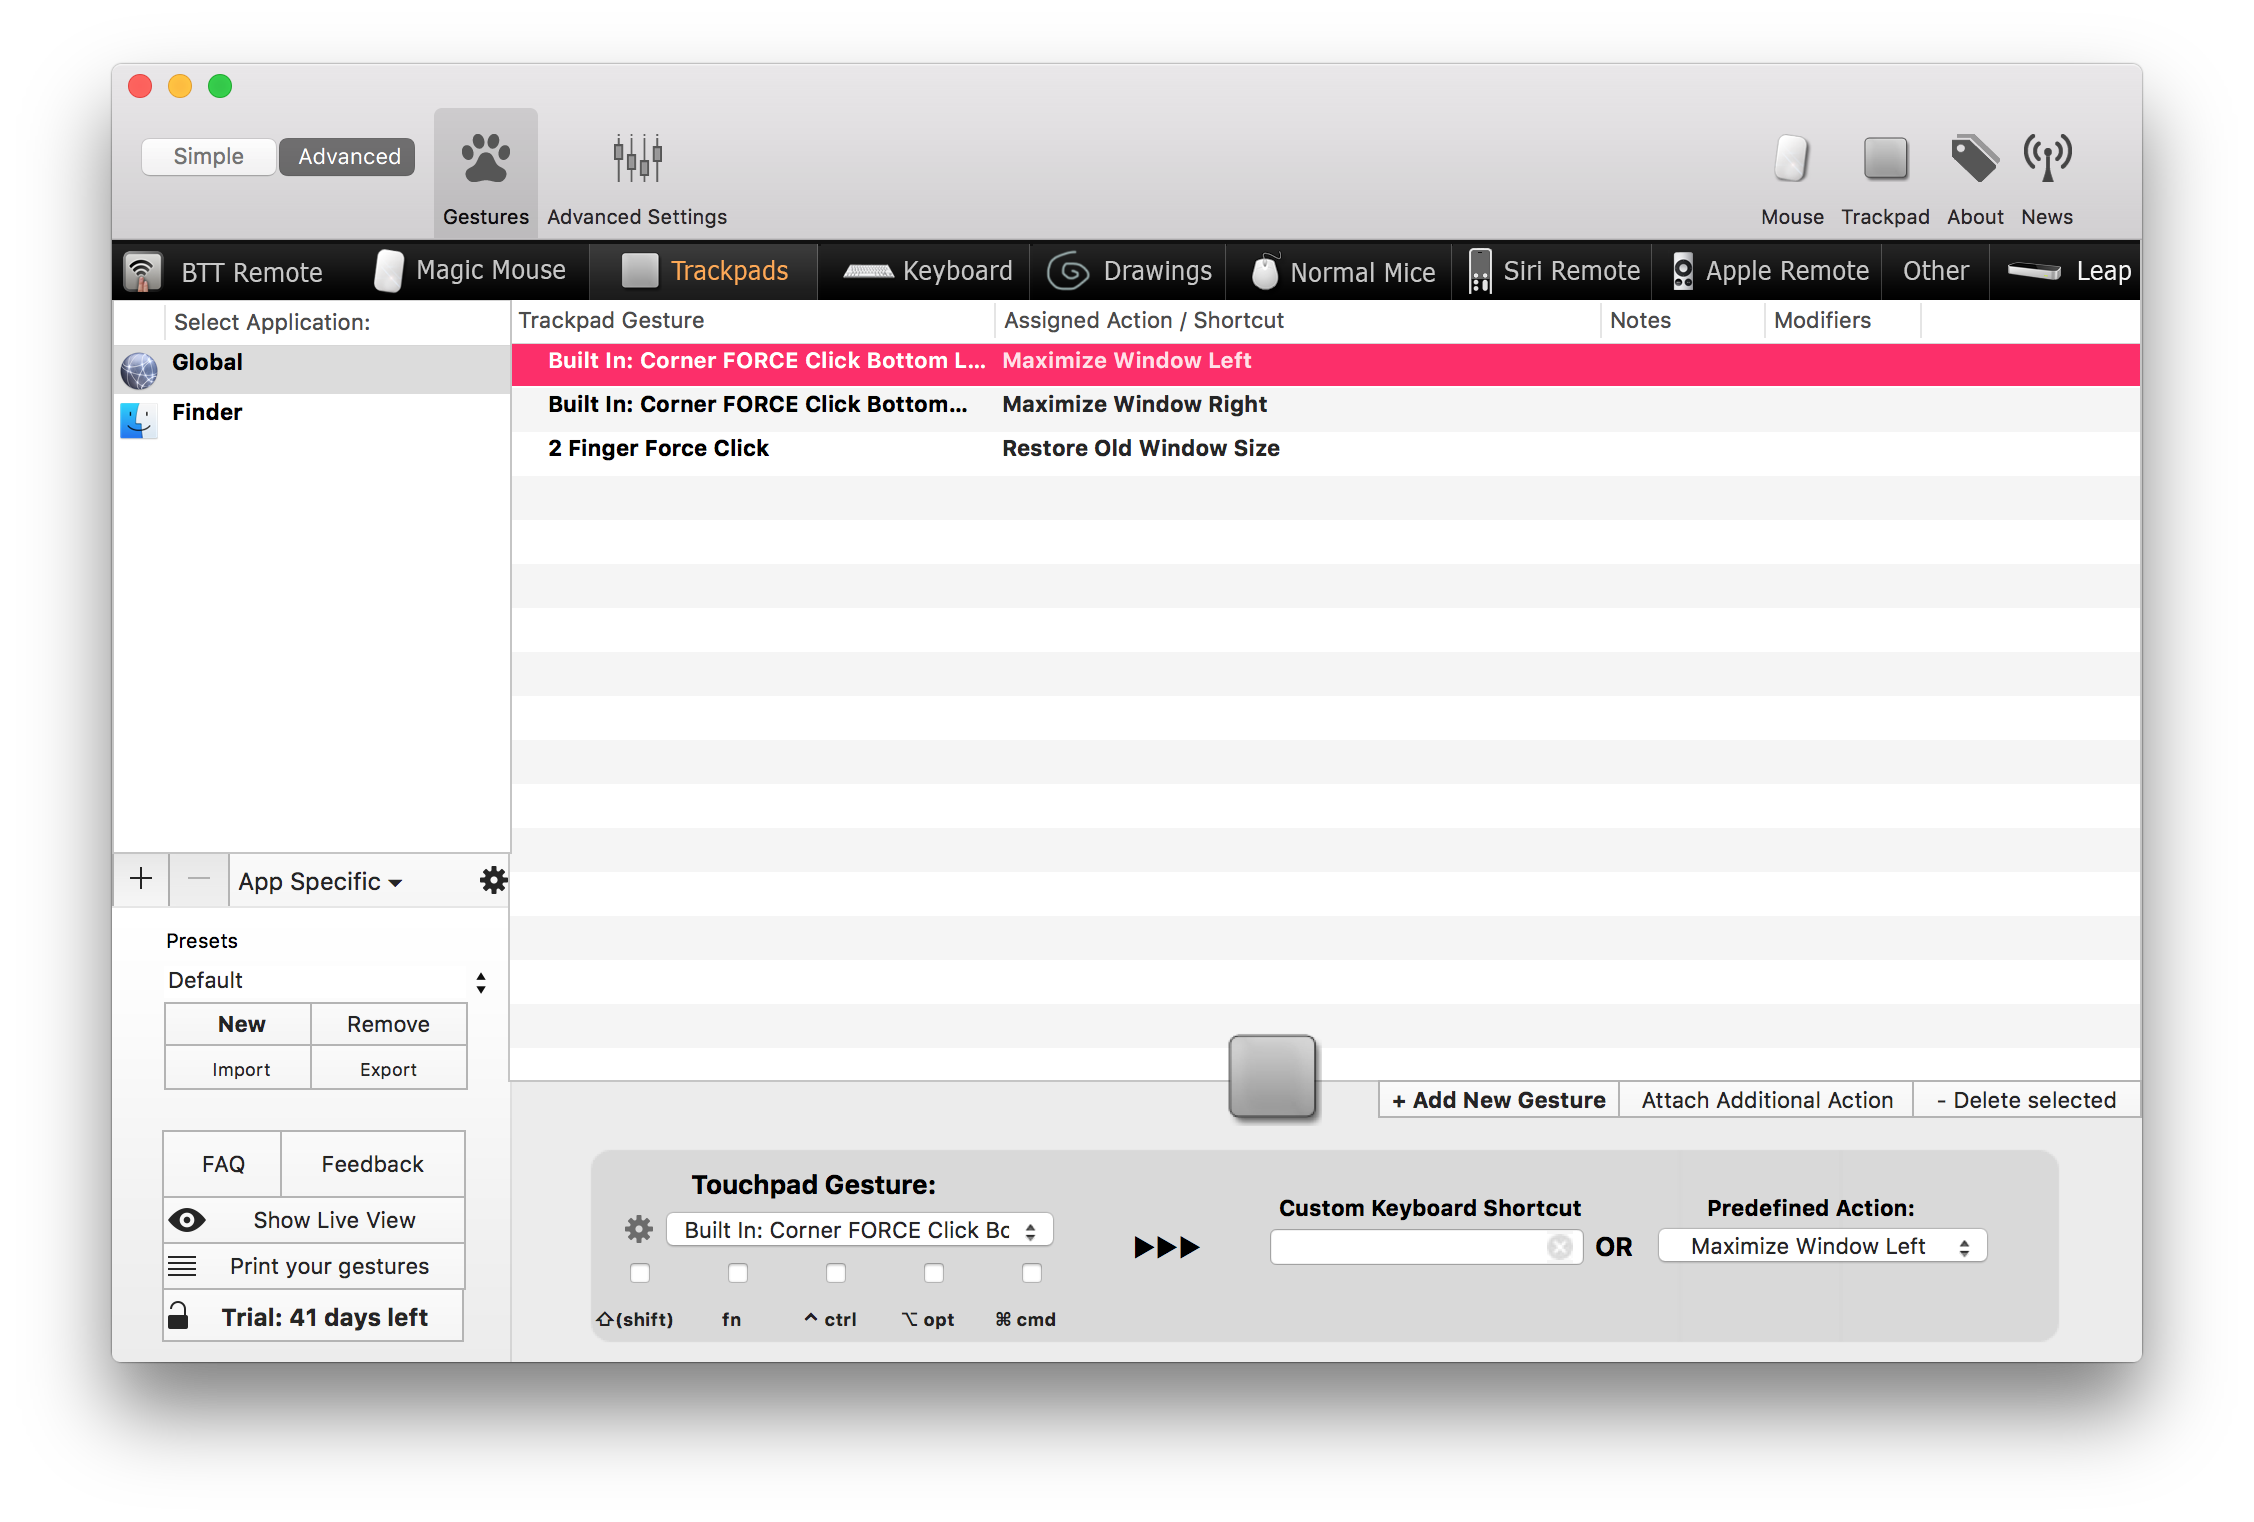
Here’s a power user top tip for those trying to manage their multiple windows. Sometimes, it’s great to have two windows side by side, but manually resizing them is a pain and using macOS Sierra’s built-in split screen tools isn’t as intuitive as it should be.
As an alternative, BetterTouchTool includes some handy window snapping tools as well as being able to map gestures via the trackpad to magically resize your windows.
Our top power tip is for MacBook Pro users with the ForceTouch trackpad: Using BetterTouchTool, You can configure a ForceTouch press for each corner to resize the currently active window to fill half the screen of the side the corner corresponds to.
In other words, it only takes two clicks to go from this:
To this:
BetterTouchTool can be downloaded here and a free 45 day trial is available so you can play with it and see how it can boost your productivity.
Download and configure it using the settings below:
As a forward thinking team, with a track record in enabling businesses to do amazing things with technology, we’ve been hard at work with our team to put the structure and systems in place to allow us to truly enable schools to realise new teaching and learning ambitions through technology.
All too often we hear schools grumble about obstacles to embedding classroom technology in their teaching and learning workflows. Some obstacles are technical, some strategic, others pedagogical, but all are equally important to address in order to ensure that a school’s investment in technology enables them to achieve on their vision for academic excellence. We know how to remove these obstacles!
As we shake things up by providing support to schools unlike any other, expect to see more here and at leftbrain.education on the following:
Apple in Education
Google Apps for Education
Classroom Management with MDM
Infrastructure & WIFI Management
Pedagogical Development Training & Mentoring
Swift Playgrounds - Curriculum Ready Coding
For now, if your school could use some help (re)deploying and or managing devices, as well as training your staff on how to use them beyond the specs on the boxes they came in, we’d love to show you how!
We’re delighted to announce that we’ve gained a couple of new braincells over the past month, adding to the elite team of systems engineers we have to support you and your team, woo hoo!
Dustin previously worked for an Apple Premium Reseller in Cape Town as a Senior Support Specialist. He was also was a team leader and training coach, not only training clients and other staff on how to be bosses, but also by creating Knowledge Base articles with Technical FAQs on how to keep calm and carry on working.
Charlie has an equally impressive background in tech wizardry, with plenty of years experience configuring and supporting Macs and iOS devices in challenging creative spaces such as art galleries and theatres. As a former Apple Genius, Charlie’s a seasoned vet when it come squishing bugs of all shapes and sizes, so we’re thrilled to also have his expertise at hand.
The upcoming release of iOS 9.3 represents a pivotal moment in the enhancement of iOS as a transformative platform for teaching and learning with Apple.
While the release itself ushers in a wealth of improvements for schools using iOS devices, the technical aspects of your existing infrastructure and supporting services will need to be carefully considered in order for you to have a seamless deployment as well as realising all the great new features that Apple has in store for you!
From a technical perspective, there’s are a number technical questions you should have addressed on your roadmap to updating to iOS 9.3, such as:
Which features (if any) in iOS 9.3 will your current devices support?
What are your plans for devices that won’t support iOS 9.3? How do plan on using these devices amongst others running iOS 9.3?
Is your WIFI infrastructure capable of handling an increase in local network traffic?
Do you have a Mac Server and can it be assigned a static IP?
Will your MDM have support for the iOS9.3 features your hoping to use at the time you intend on deploying?
How do you plan on managing BOYi iPads running iOS 9.3?
Does your MIS plan to support and integrate with Apple School Manager?
How many users will your iPads be able to support in a Shared iPad environment?
…
There’s also subtleties to also consider with regards to how you’ll adapt your overall pedagogical practises to leverage the new features coming with iOS 9.3, but having the right infrastructure as well as roadmap to deployment is a crucial first step.
We’ve been combing through Apple’s technical guides (so you don’t have to) and proactively finding answers to potential snags you’re likely to encounter. Our elite team of engineers, strategists, trainers and project managers would love to share our expertise and guidance in drawing up your deployment plan for iOS 9.3. If you could use our help, we’d be happy to!
You may have an Snow Leopard Server and you run your business on it. Your client Macs may also connect to it for File Sharing, VPN, or other services that are available on this full featured server operating system.
You also want to make sure that your client Macs use up to date operating systems and you’ve made the decision to upgrade them all to El Capitan.
If you have only a few Macs then it makes sense to just use the App Store to upgrade. If you have more than a few you could create a USB key with the El Capitan installer on it and visit each Mac and upgrade them - may you want to make copied of the installer key to give to your support team so the upgrade can be done in less time.
What if you have a lot of Macs to upgrade? You could use the NetBoot/NetInstall service to make this job much easier for. Great, but you have a 10.6 Server operating system, you have no idea whether you can achieve this using a 7 year old server and you don’t want to test using your production server. Just in case things go wrong due to configuration changes you will make.
Thankfully, we at LeftBrain have tested this and we can confidently say that it works!
If you want to test this yourself then read the rest of this blog post.
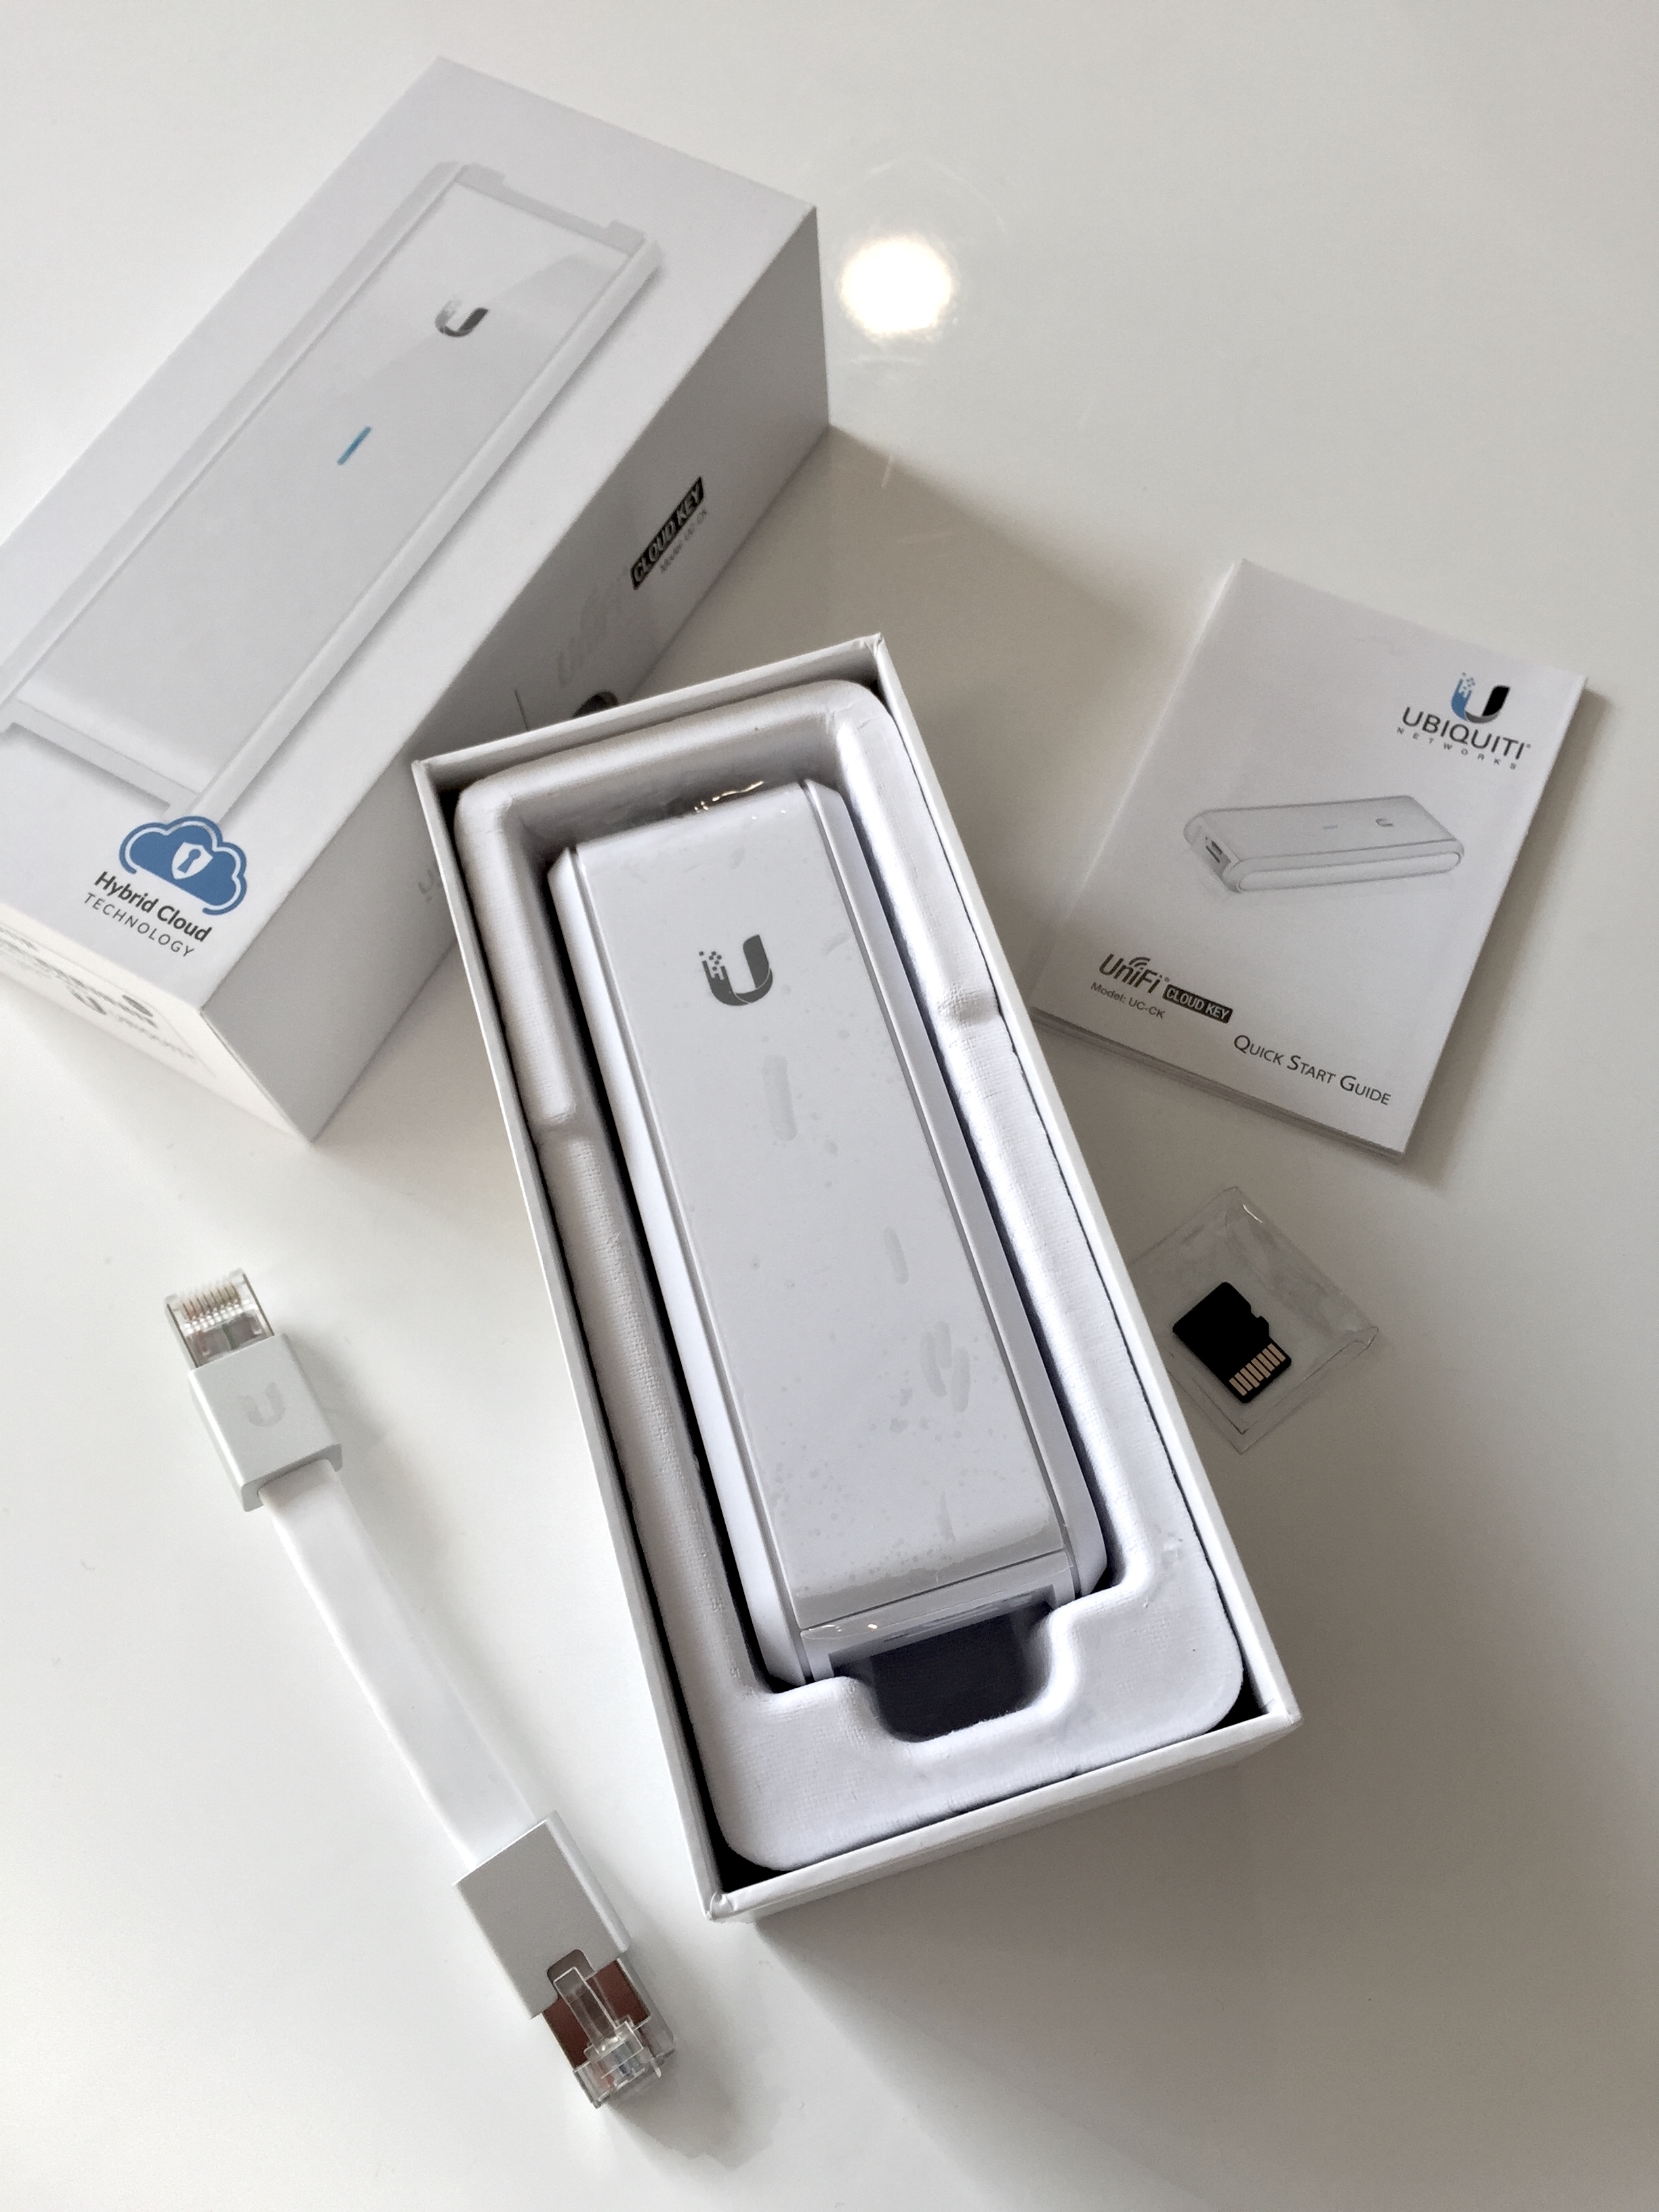
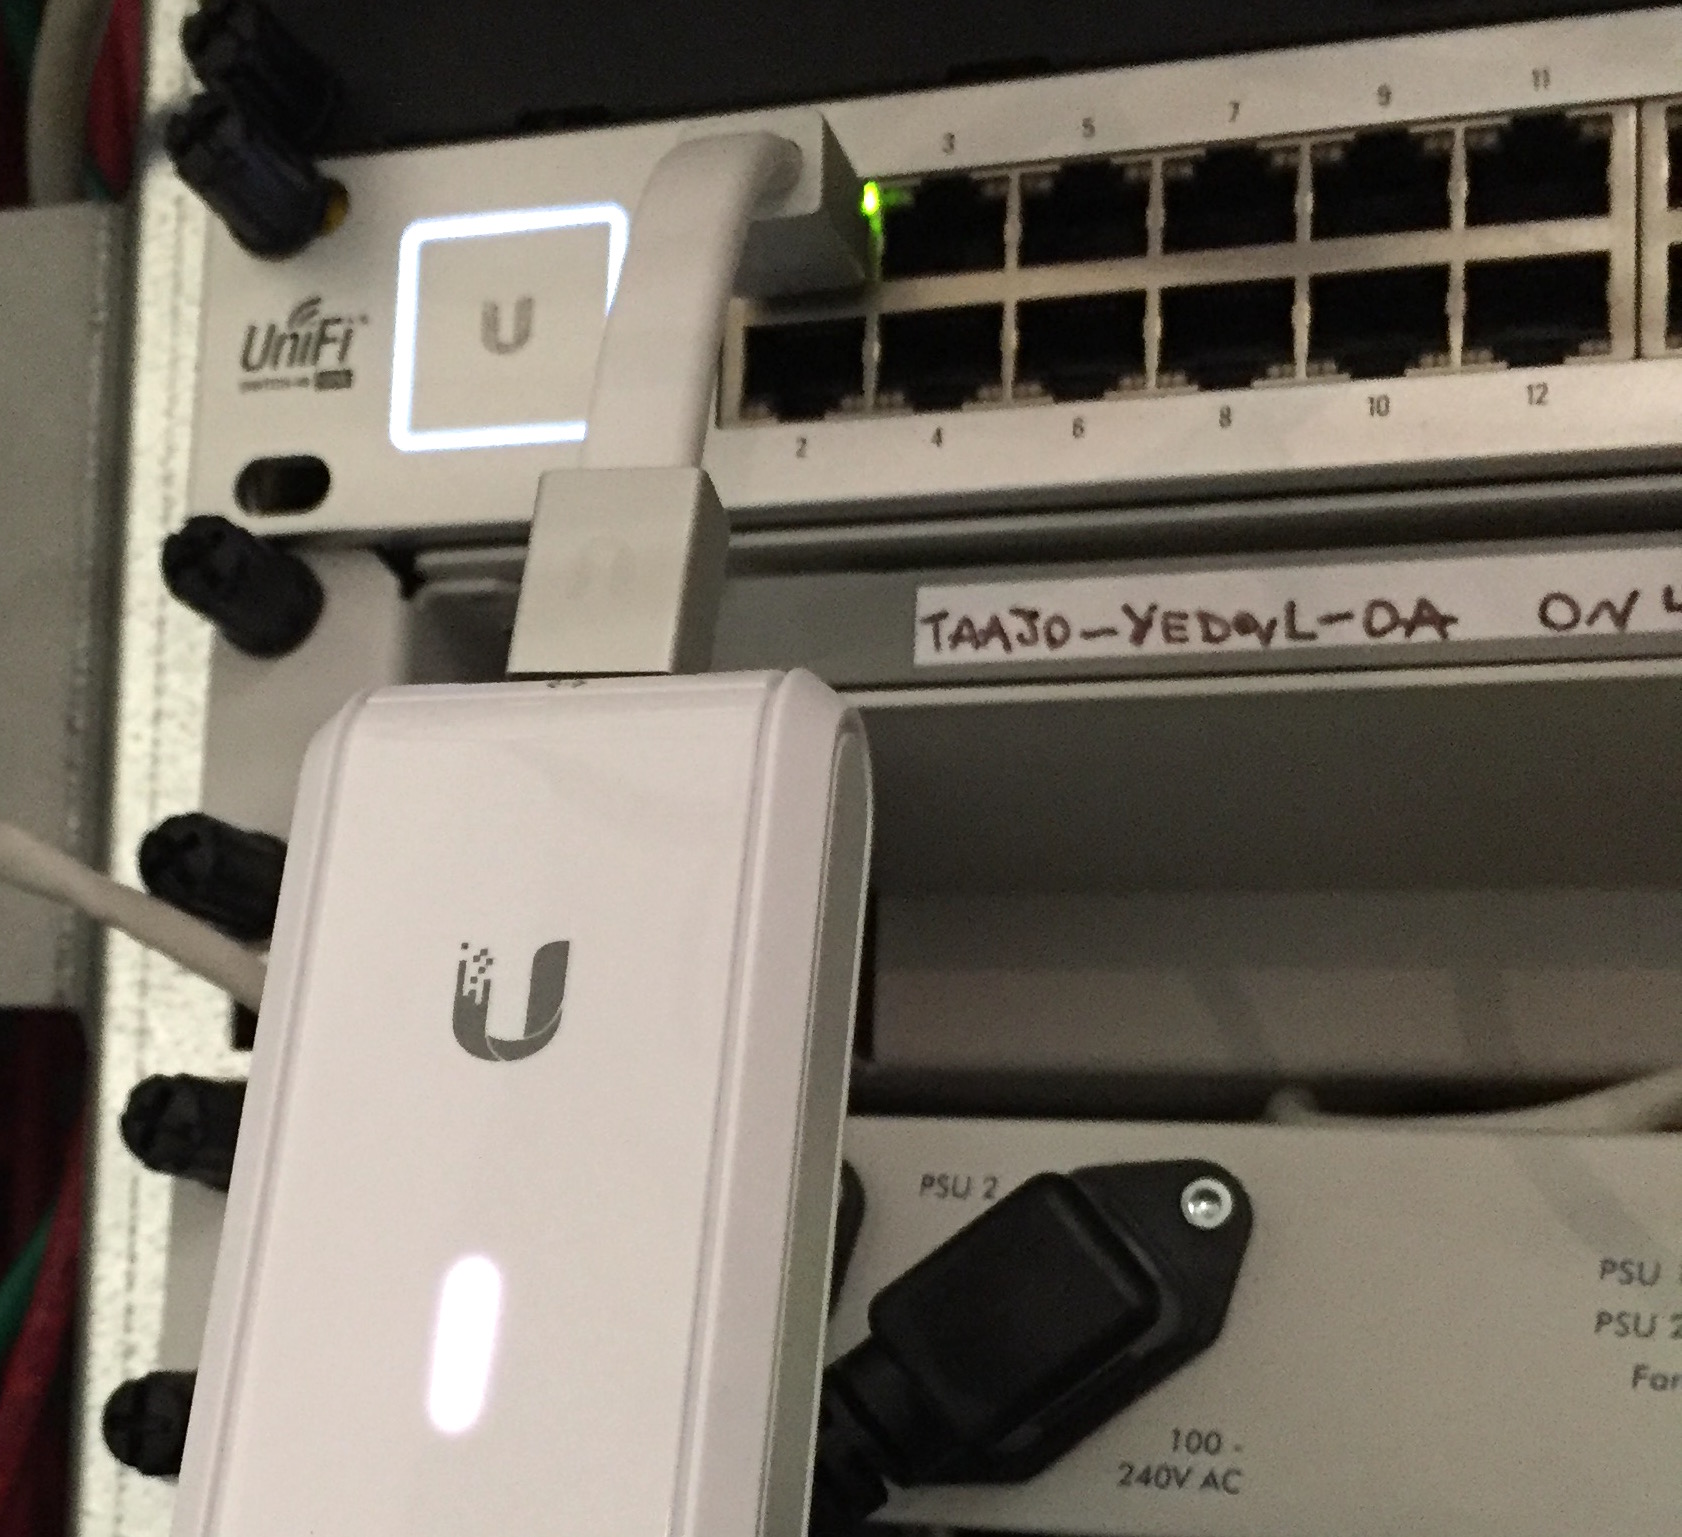
LeftBrain were tasked with replacing an ageing WiFi network for one of our favourite clients (it’s hard to choose) who were experiencing patchy AirPlay performance and signal dead spots in their studio. We’ve had a lot of experience configuring Ubiquiti’s UniFi products for events and workspaces, so we recommended purchasing some of the latest kit to give our client’s network infrastructure a boost. Disclaimer: we haven’t been paid to say nice things about them.
Ubiquiti’s new UniFi CloudKey is a “Hybrid Cloud” computer-on-a-stick-from-the-future, running Ubiquiti’s UniFi controller software. This allows you to manage other UniFi devices and monitor client data usage from a locally-run controller, with the benefit of being accessible remotely. This is handled in a very similar way to Synology’s QuickConnect remote access, with SSO to access multiple sites and no need to open ports on a router.
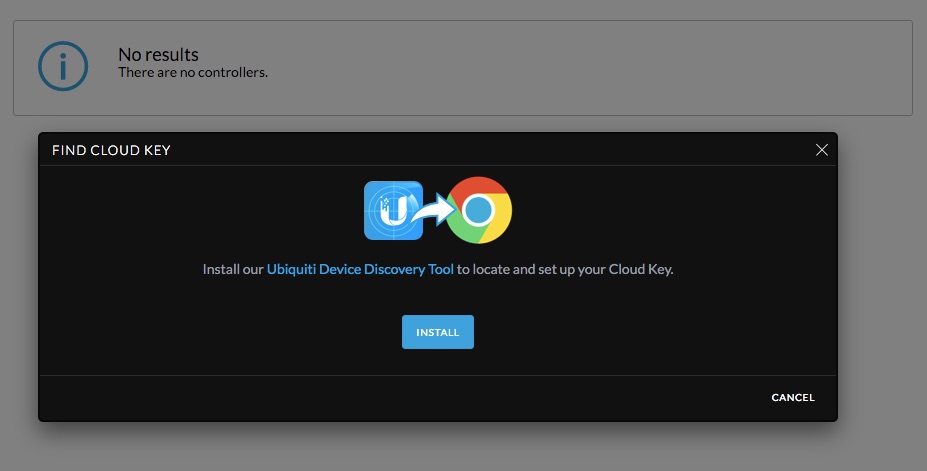
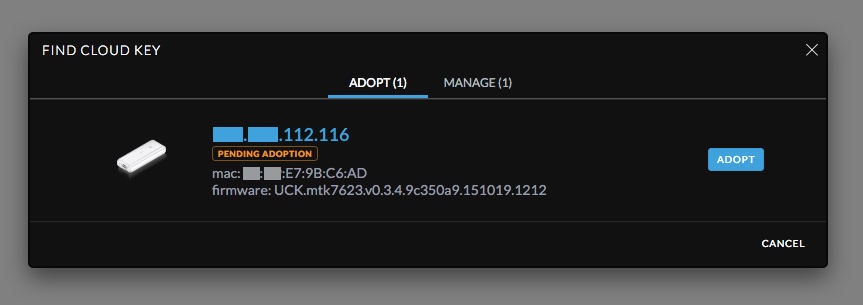
Setup proved to be very simple; a quick visit to https://unifi.ubnt.com to create a Ubiquiti account, confirmation via email, and the adoption process begins. Connect the CloudKey to PoE (we’re using a fancy pants new UniFi Switch, but you can use any 802.3af injector or micro-USB), and the rest is all via t’Interwebs. It’s an interesting design, although I’m not totally sold on the awkward way it hangs off a switch.
The (Chrome-only) Ubiquiti Device Discovery Tool extension instantly found the CloudKey on the local network, and quickly adopted it to the account. From there, it’s a straightforward process to create a site on the controller. With the site settings configured, the controller found and adopted the new UniFi Switch and APs on the LAN with no need to use the old (and clunky) UniFi-Discover app to point the devices towards your hosted controller.
Ubiquiti offers the switch in 24- and 48-port flavours with various wattages - the higher, the better if you’re powering lots of PoE APs, VoIP phones or IP cameras on your network. The 48-port models also have 2 SFP+ ports for 10Gb/s links to another switch, or a server with SFP+ connectivity. They’re designed for use with the UniFi Security Gateway, but we’re using a perfectly competent (though not as shiny) DrayTek 2925 here connected to an Exponential-e fibre circuit.
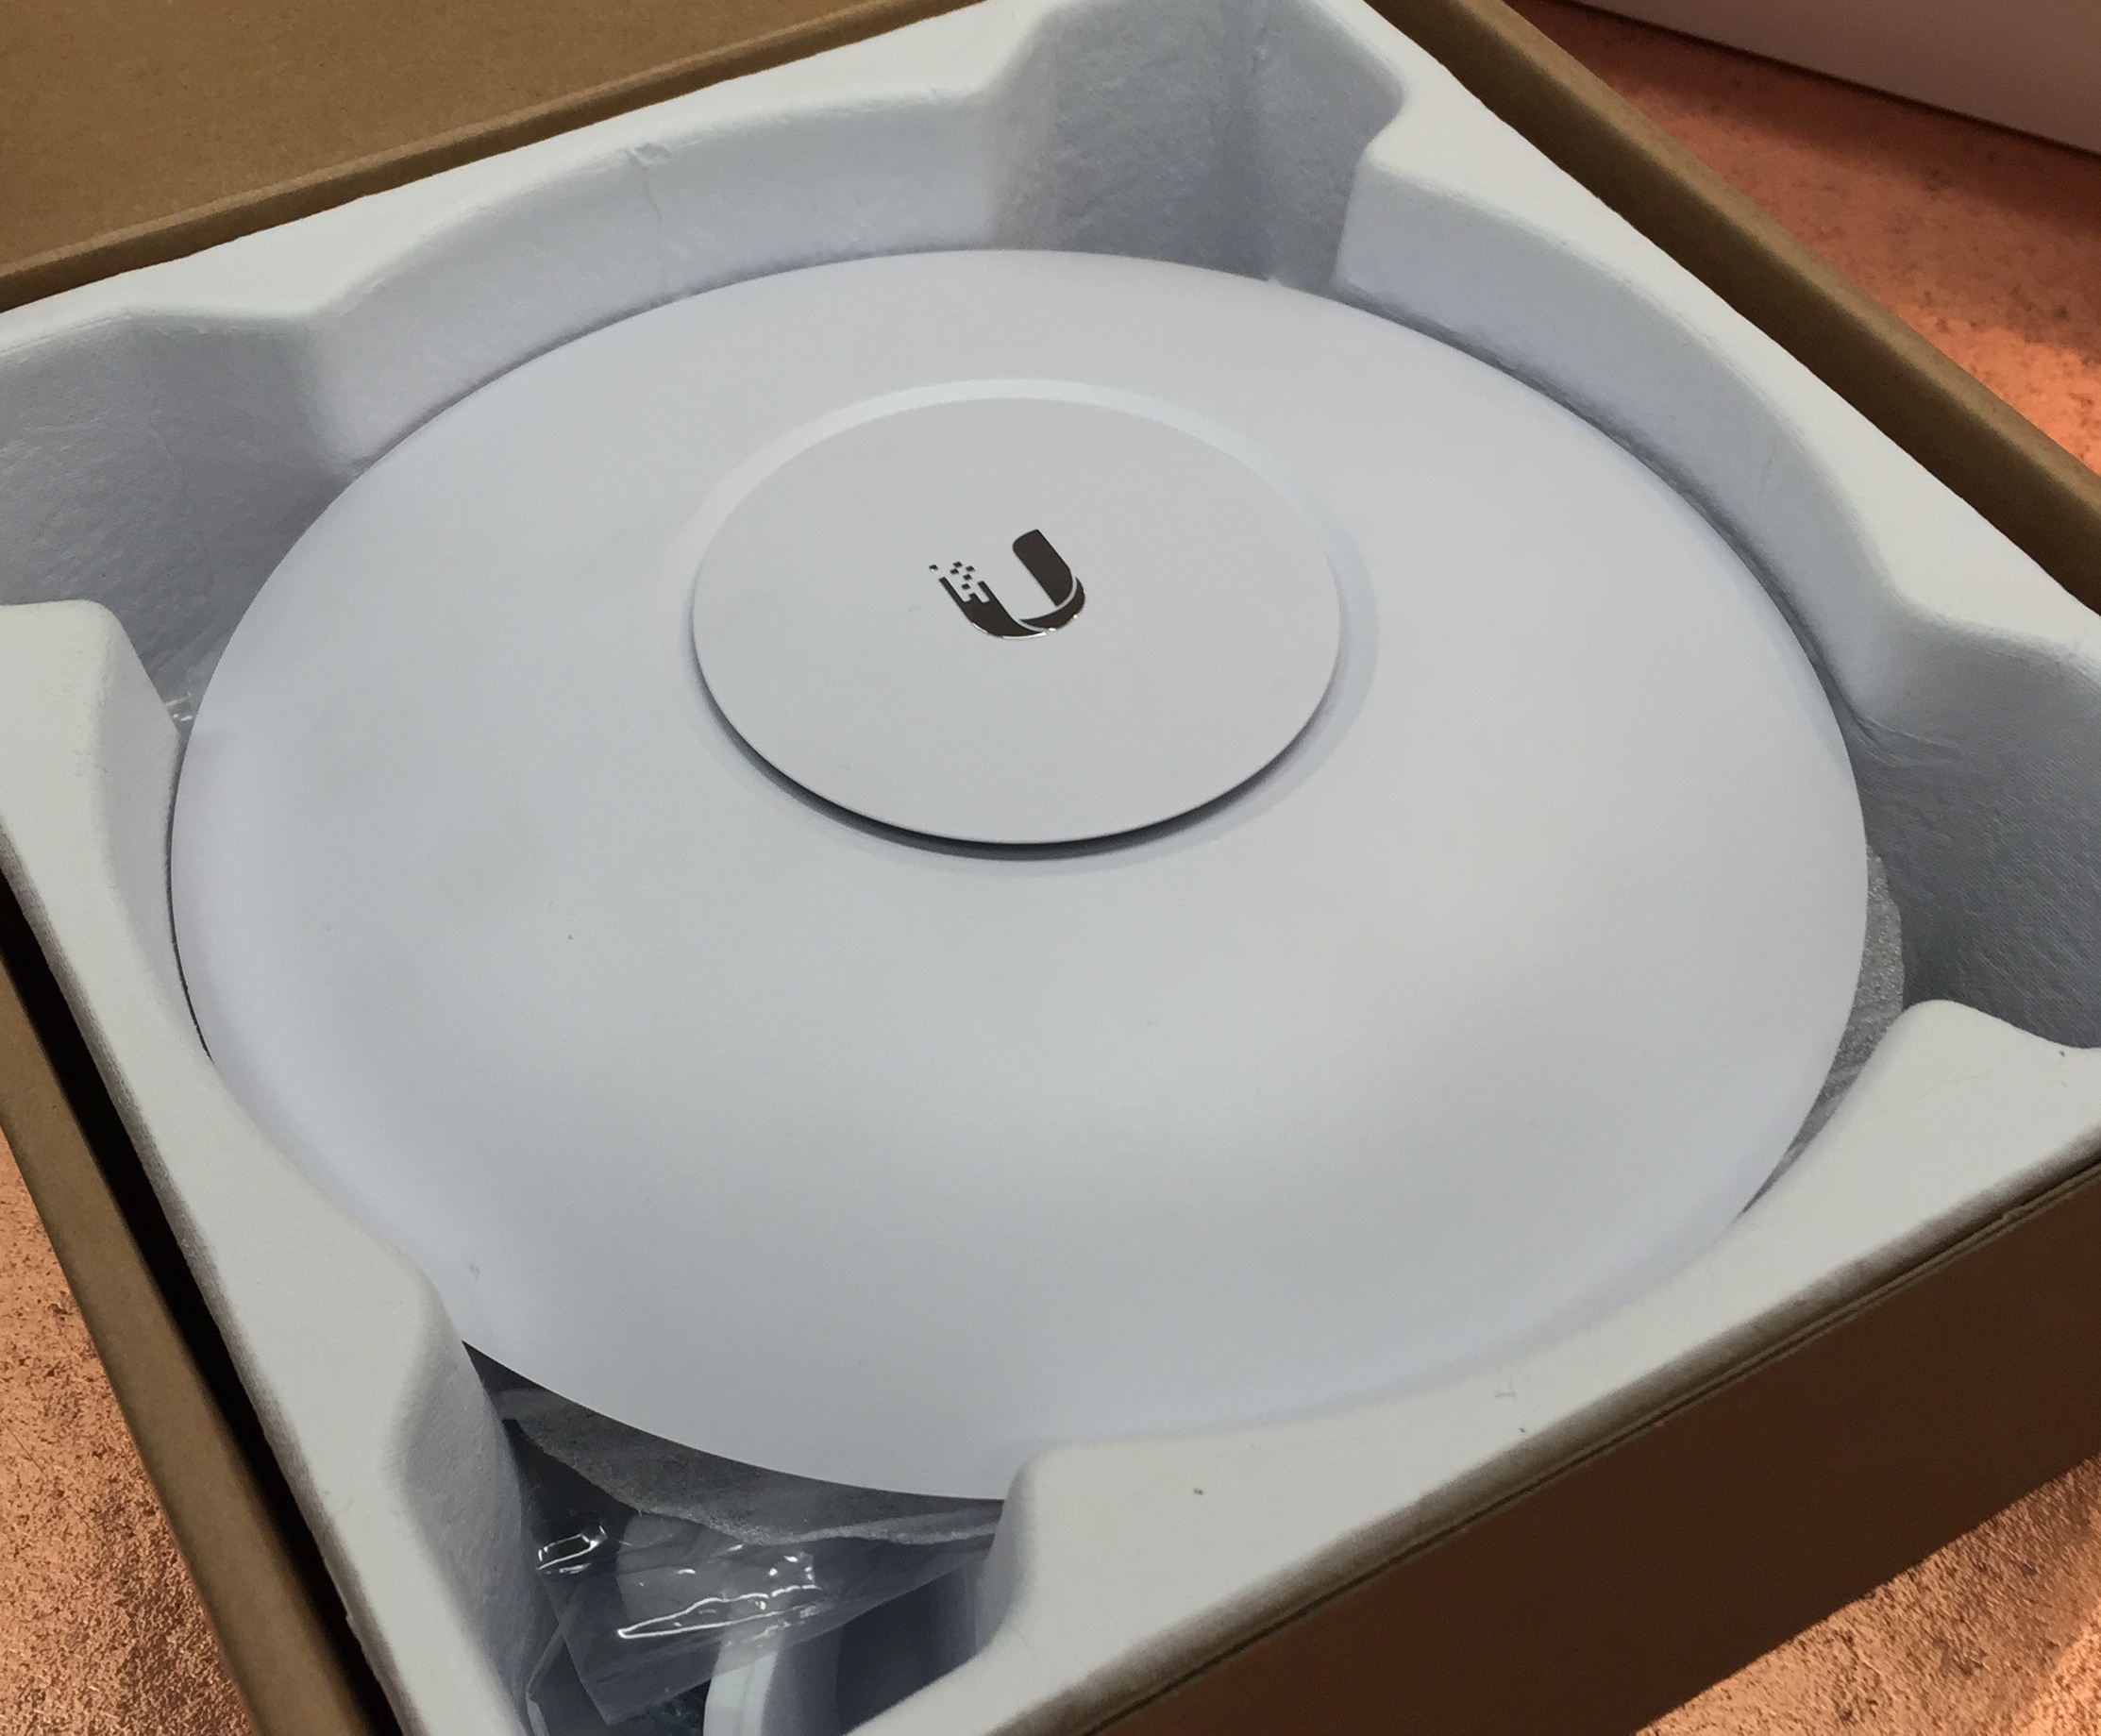
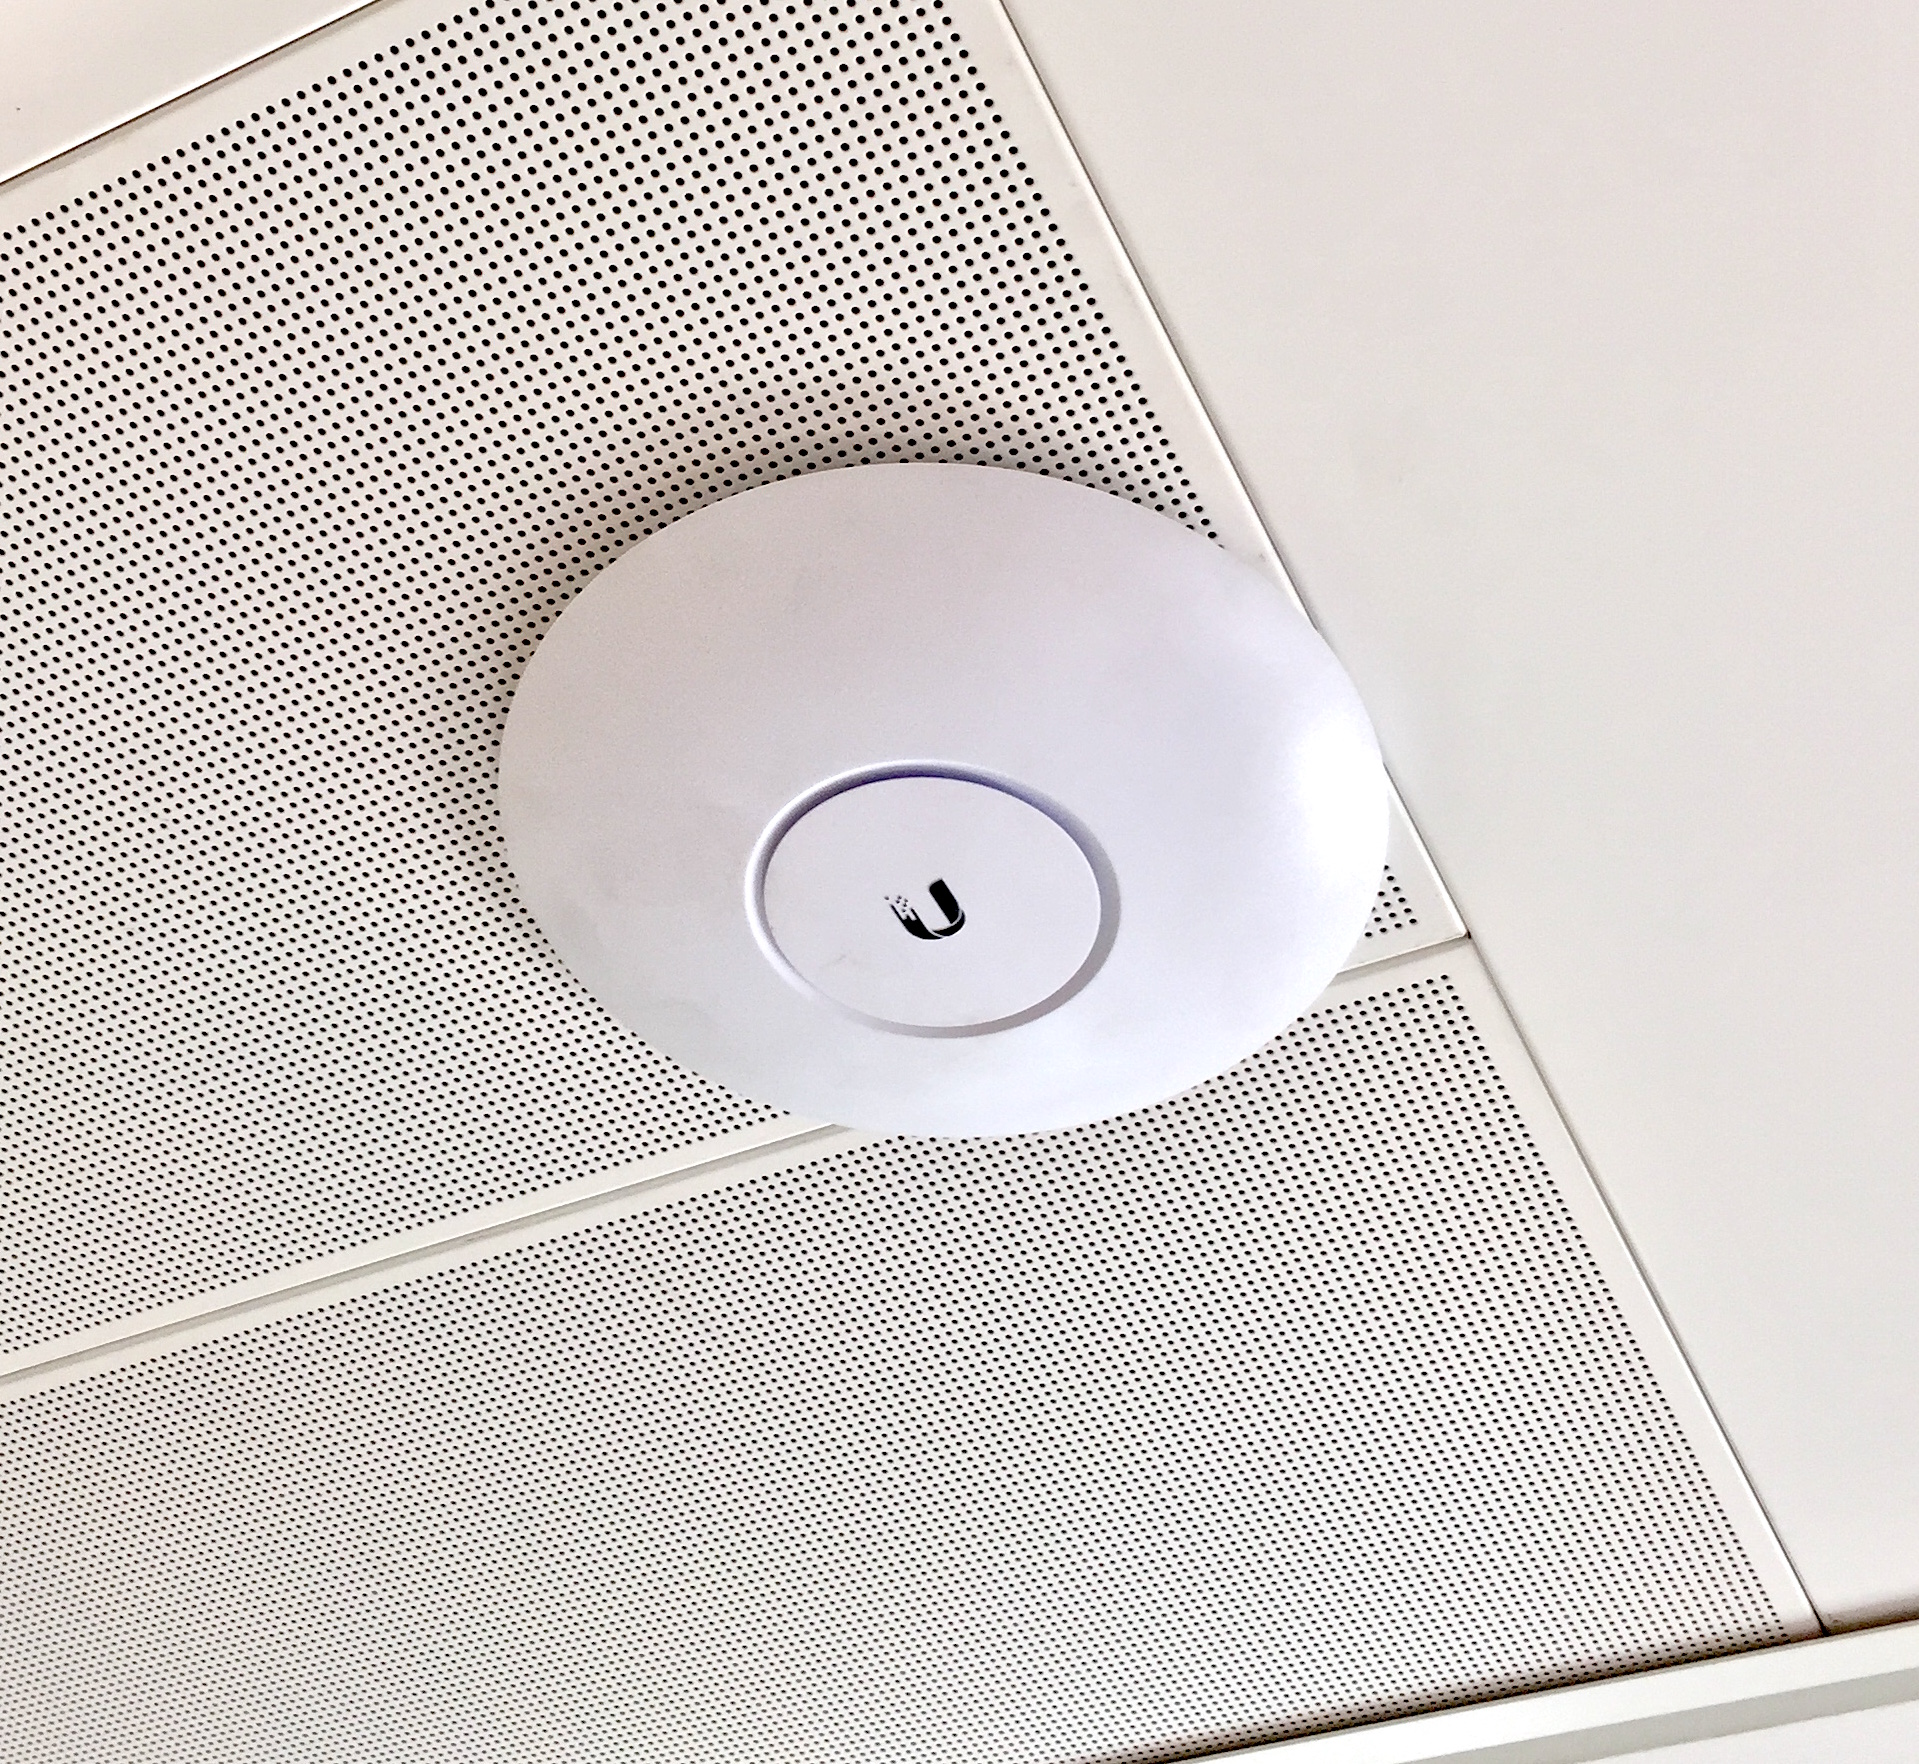
The new UniFi AP AC PROs look confusingly similar to the first-gen UniFi UAPs, but this is a good move in this correspondent’s opinion - they’re much prettier than last season’s square models. Kicking out a maximum of 1300Mb/s via 802.11ac, they make the most of that new MacBook Pro or WiFi-enabled toaster you got for Christmas. Our client has structured cabling in the panelled ceilings, making it easy to mount the APs and hide the cabling - no drilling required!
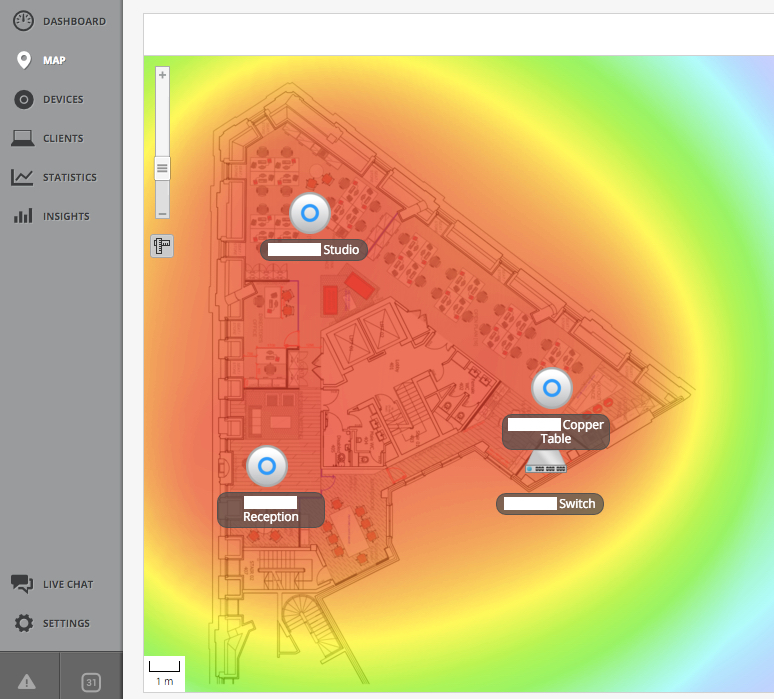
The UniFi controller allows you to upload a site map and identify dead spots - although this isn’t a replacement for a hands-on survey, as it doesn’t account for environmental factors like wall material, for example. A quick wander-around with NetSpot confirms that all areas with high traffic are nicely saturated with WiFi loveliness.
Annoyingly, I had to upgrade the CloudKey firmware and controller to enable remote access - something I didn’t realise until offsite! Fortunately I had VPN access to update this - but the upgrade implementation is clunky and could do with some work. Ubiquiti has a habit of rushing out new hardware with less-than-ready software, but their user group community is a great resource for troubleshooting and you’ll usually find the answer to any queries there.
Despite these slight flaws it’s been a surprisingly painless setup and provides an affordable entry into the UniFi ecosystem, without the maintenance costs associated with other managed controllers (other managed controllers are available).
Looking to give your network infrastructure a boost? Get in touch!
As a cloud-first Apple solutions provider for Business, Enterprise and Non-Profits, we love what Google’s app suite has to offer, so much so that we use it ourselves! If you’ve ever wondered what it’s like to have a reliable solution for your team that has collaboration at its core and or longed to migrate to one, Hello!
As Google for Work advocates we have the demonstrable expertise and Google Certified Administrators to help you implement insanely great solutions for your team to dream bigger and achieve their best work.
Not only can we migrate your team to Google Apps, we can also help to develop and maintain your infrastructure so you have reliable comms via Gmail, shared Google Calendars for your recon missions, can call remote team huddles with Hangouts, as well as having a secure cloud share for your mission plans with Google Drive!
We’re as passionate about technology as we are for supporting our tech embracing clients, and we’re always eager to use our knowledge and technical wizardry to help give your team a reason to hi-five more often!
As always, if you’d like to know more about our Google Apps for Business service or could use our guidance and support, please do give us a nudge via help@leftbrain.it!
We’ve recently implemented a new strategy for our clients so we can proactively automate the reporting of their server infrastructure with scheduled Server Health Checks.
By deeply embedding tools like Server Density into our workflow and directly integrating them with Zendesk and our Slack comms, our automated Server Health Checks allow us to deal with potential errors in running server updates, dealing with failed backups and or corrupt data before things get nasty!
We all like a break from being at our desks regularly, but a break in realising an idea because of system downtime sucks, so we usually aim to be in touch and alert our clients of developing issues long before they happen, but when snags do occur, one of our braincells is almost certainly already working on a fix remotely or on their way to sort things out onsite.
We understand and care that your systems are at the heart of your ambitions as a business, school or enterprise, therefore we’re always quietly doing digital Tai chi to ensure that nothing interrupts or hinders your team and their workflow.
If you’d like to know more about our proactive approach towards infrastructure management or you could use our help, please do give us a nudge via help@leftbrain.it!
The Mac Photos App is great and certainly an improvement over it’s predecessor iPhoto. However, it’s almost always too eager to pop up whenever it detects an iOS device being plugged in. Certainly, when we’re setting up and managing hundreds of iPads for schools or at our events, having to manually close down Photos per iPad plugged in gets very dull indeed.
However, salvation is here in the form of the following command.
Simply copy and paste the following into Terminal: (Please note this should all go on one line!)
“You can’t get viruses on a Mac” and “they just work”.
Both are true to an extent, and as a passionate Apple user and former employee I believe their ecosystem is fantastic and far stronger than others out there. However, there are always threats in the realms of technology, and whether the term ‘virus’ is strictly accurate in this case or not, Apple isn’t immune to malware, and it’s crept it’s way into OS X more noticeably recently.
What does ‘malware’ mean?
Malware is a term for malicious or intrusive software that can come in many different forms, and can be used to obtain personal information such as bank details, display unsolicited advertisements, or generate marketing revenue by redirecting traffic.
A paper recently released by Bit9 + Carbon Black states that five times more malware for OS X has appeared in 2015 than during the previous five years combined (source link)
How does it find it’s way onto my machine?
There are many different ways malware can find it’s way through but in most cases on a Mac from my experience it has been through ‘phishing’ emails which may appear to be from a recognised company or source (or friend if their account has been affected in some cases) and either have a link or downloadable attachment that can let in some nasty scripts into your machine.
So, how can I protect myself?
First and foremost, exercising caution with emails and anything that seems slightly out of the ordinary. For example, most companies won’t ask for your password or any details directly through an email, particularly a bank. Also, if it is a link appearing to come from a company that you have an account with saying you must sign in to make changes for whatever reason, rather than clicking on the link in the email try going to their website directly through a browser (e.g. Safari / Chrome) and seeing if it is prompting you to change anything from there.
The next step I would strongly recommend if you have any existing malware concerns or want to be able to scan your system and check is to download and install a free application called Malwarebytes (there’s also a premium version available). You can download it here:
Once you’ve downloaded it, run a scan, and it’s very quick and efficient at discovering and wiping any hidden malware that you don’t want there. However, recently I discovered another attack that Malwarebytes hasn’t yet been able to find.
A new threat
Prior to the Malwarebytes application, I used the below website as a great resource for manually finding and getting rid of malicious software, however unless you are an experienced user of OS X then I would strongly recommend against doing this yourselves, as a lot of the files and folders you are looking at may have odd-looking names but the system needs them to operate, and deleting the wrong one could corrupt your operating system (so is best avoided!).
These are the guys that developed Malwarebytes, and for earlier intrusions (Vsearch and Geneio being notable culprits) the guides and application are great for removing them.
The other day the malware I found on a machine had cut out network access for the user and appeared to be an evolved version of Geneio which had changed itself to many different names hidden away in the user library rather than just the one previously, such as the following:
InKeepr
InstallMac
Javeview
Leperdvil
Manroling
Otwexplain
Eliaho
Montageobox
Nariabox
Again, if you are unsure about any of this and have malware concerns that the Malwarebytes application isn’t picking anything up then I wouldn’t advise going in to delete system files yourself unless you have experience in this field; get in touch and we can help!
Where the malware in this example had cut out the network connections we set up a Guest User account (System Preferences > Users & Groups > Enable Guest User) and logged into this account. From here I was able to change the permissions for the user account that had been affected in Finder to allowing everyone access to view and edit, so we could go in and delete what needed to be.
An interesting tip here, one way to be able to view the (hidden) library folder when not in the user account is to show hidden items in Finder. You can do this through a Terminal command:
This will show you hidden files and folders, in this case we need to go to the users ‘Library’ folder. Note, to reverse the above change you can open Terminal again and write this command line to switch hidden files and folders back to being hidden:
defaults write com.apple.finder AppleShowAllFiles NO
Now I could access the hidden library folder of the affected user account, and this is where I discovered lots of the above names popping up in Application Support, Launch Agents, Preferences, and went through deleting them and then emptying the Trash. It took some time searching through them, but eventually they all appeared to be cleared out, at which point we logged out of the Guest User account and back into the original account and things were fine again!
So, my advice would be always to exercise caution particularly with emails with links and attachments (even if they appear to be legit), download Malwarebytes and run a scan for peace of mind, and if you have more issues, queries or concerns get in touch at help@leftbrain.it and we can help!
Our Zendesk Help Centre is a great way for our clients to see their support tickets, and access company specific help content. We wanted to take it a step further and let our users chat with their support teams in real time. Enter Intercom!
Adding Intercom to our Help Centre was simple, but took a while to find the Javascript object that would tell Intercom the users name, email and organisation details. To get it running, just go to the Help Centre, click Customize Design, then Edit Theme. In the JS section, add the following code right at the bottom (substituting the Intercom ID xxxxxxxxx with your own).
There are some other really nice integrations between the two products: you can view Intercom data in the sidebar of the Zendesk interface, and you can send conversations from Intercom into new Zendesk tickets.
Over the years we have perfected the fine art of deploying and managing Apple devices for events and seminars of all shapes and sizes. Handling delegate registrations, keynote presentations, AirPlay connectivity, asset tracking devices, or all of the above, it’s all a breeze, when you know how to.
Whether you’re looking for a solution for a small training session with 20 people in a room with a simple A/V setup, or an event with hundreds of attendees and multiple sessions taking place simultaneously throughout an entire venue space, we’ve been there, done that, and know how to handle it like a boss!
When it comes to selecting a venue with the right infrastructure, proactive project planning for potential snags, deploying devices with the required configuration and managing the technical aspects in order to ensure that devices perform as expected (as well as having contingencies for when they don’t), our team of infrastructure engineers, strategists and project managers have the expertise to ensure that your event doesn’t suck, at least from a technical perspective.
We’re eager to share our expertise and demonstrable technical wizardry to help plan for and provide onsite support for using Apple Mac or iOS devices for your events. If you’d love to know more about our work or would like our help, we’d love to hear from you!
With Monday’s preview release of Apple’s iOS 9.3 update for iPad, educators worldwide are really excited by the tools has Apple has in store to make iPad the most pleasant and engaging experience there is for modern teaching and learning.
Shared iPad for Students is a feature we know a number of schools with small class-sets of iPads have been waiting for and we’re sure educators across the board will be happy to see built-in to iOS for education. Giving students the ability to instantly recall their personal content by logging into any iPad they have access to in class should negate the need for students to be assigned the same iPad every time in order to resume a learning activity or for evidencing learning outcomes.
The new Classroom app is also another great feature enhancement for iOS in education. Over the years educators have longed for the ability to easily monitor and guide students through their lessons, as well providing simple AirPlay controls for sharing a student’s work with the rest of the class via Apple TV. The only way to do this in the past involved subscribing into MDM services like JAMF’s Casper Suite, although this then also added further cost implications for the school consider.
Having Shared iPad for Students and the new Classroom app functionality available in iOS 9.3 should have a positive pedagogical impact on teaching and learning workflows for iPads, now that every classroom with a compatible iPad will be able to take advantage of these great new features and functionality, for free!
For technical administrators, Apple School Manager should completely streamline the creation of Managed Apple IDs, as well as the creation and delivery of classroom content via iTunes U. With Apple’s VPP, DEP, iTunes U, and MDM service configuration falling under the new single Apple School Manager portal, everything will now be run from a single online portal instead of having to create and login into multiple Apple services.
Apple has a deep commitment to providing educators with the most advanced tools available in order for them to create and deliver transformative lessons for modern day students. As technical support specialists and training providers, our LeftBrain team are excited by the opportunity for us to provide even more streamlined support and management to our amazing education clients. We can’t wait to put these tools to use, as well as helping to plan for any technical considerations that schools might need to have in mind before updating. We’re hoping to get stuck in to Apple’s technical resources for the final iOS 9.3 release as soon as they are available, exciting times.
If you could use our help in planning for updating your school iPads to iOS 9.3, or if you have questions, we would love to hear from you!
We’ve been quietly operating in Dublin with a select few clients for a couple of months now. From the 1st March we’ll be officially offering our unique brand of tech support to Dublin’s finest creative companies.
Why Dublin?
With it’s vibrant and growing creative community, and thriving startup scene, Dublin is a natural fit for us. We want to help the best of them do even better!
There’s also a wealth of technical talent that we’d be crazy not to tap into.
But mostly, Dubliners just seem to get us, and share our values.
Get In Touch!
If you could use our help, or know someone who could, we’d love to meet for a chat. Email us, or give us a call on 01 442 8293.
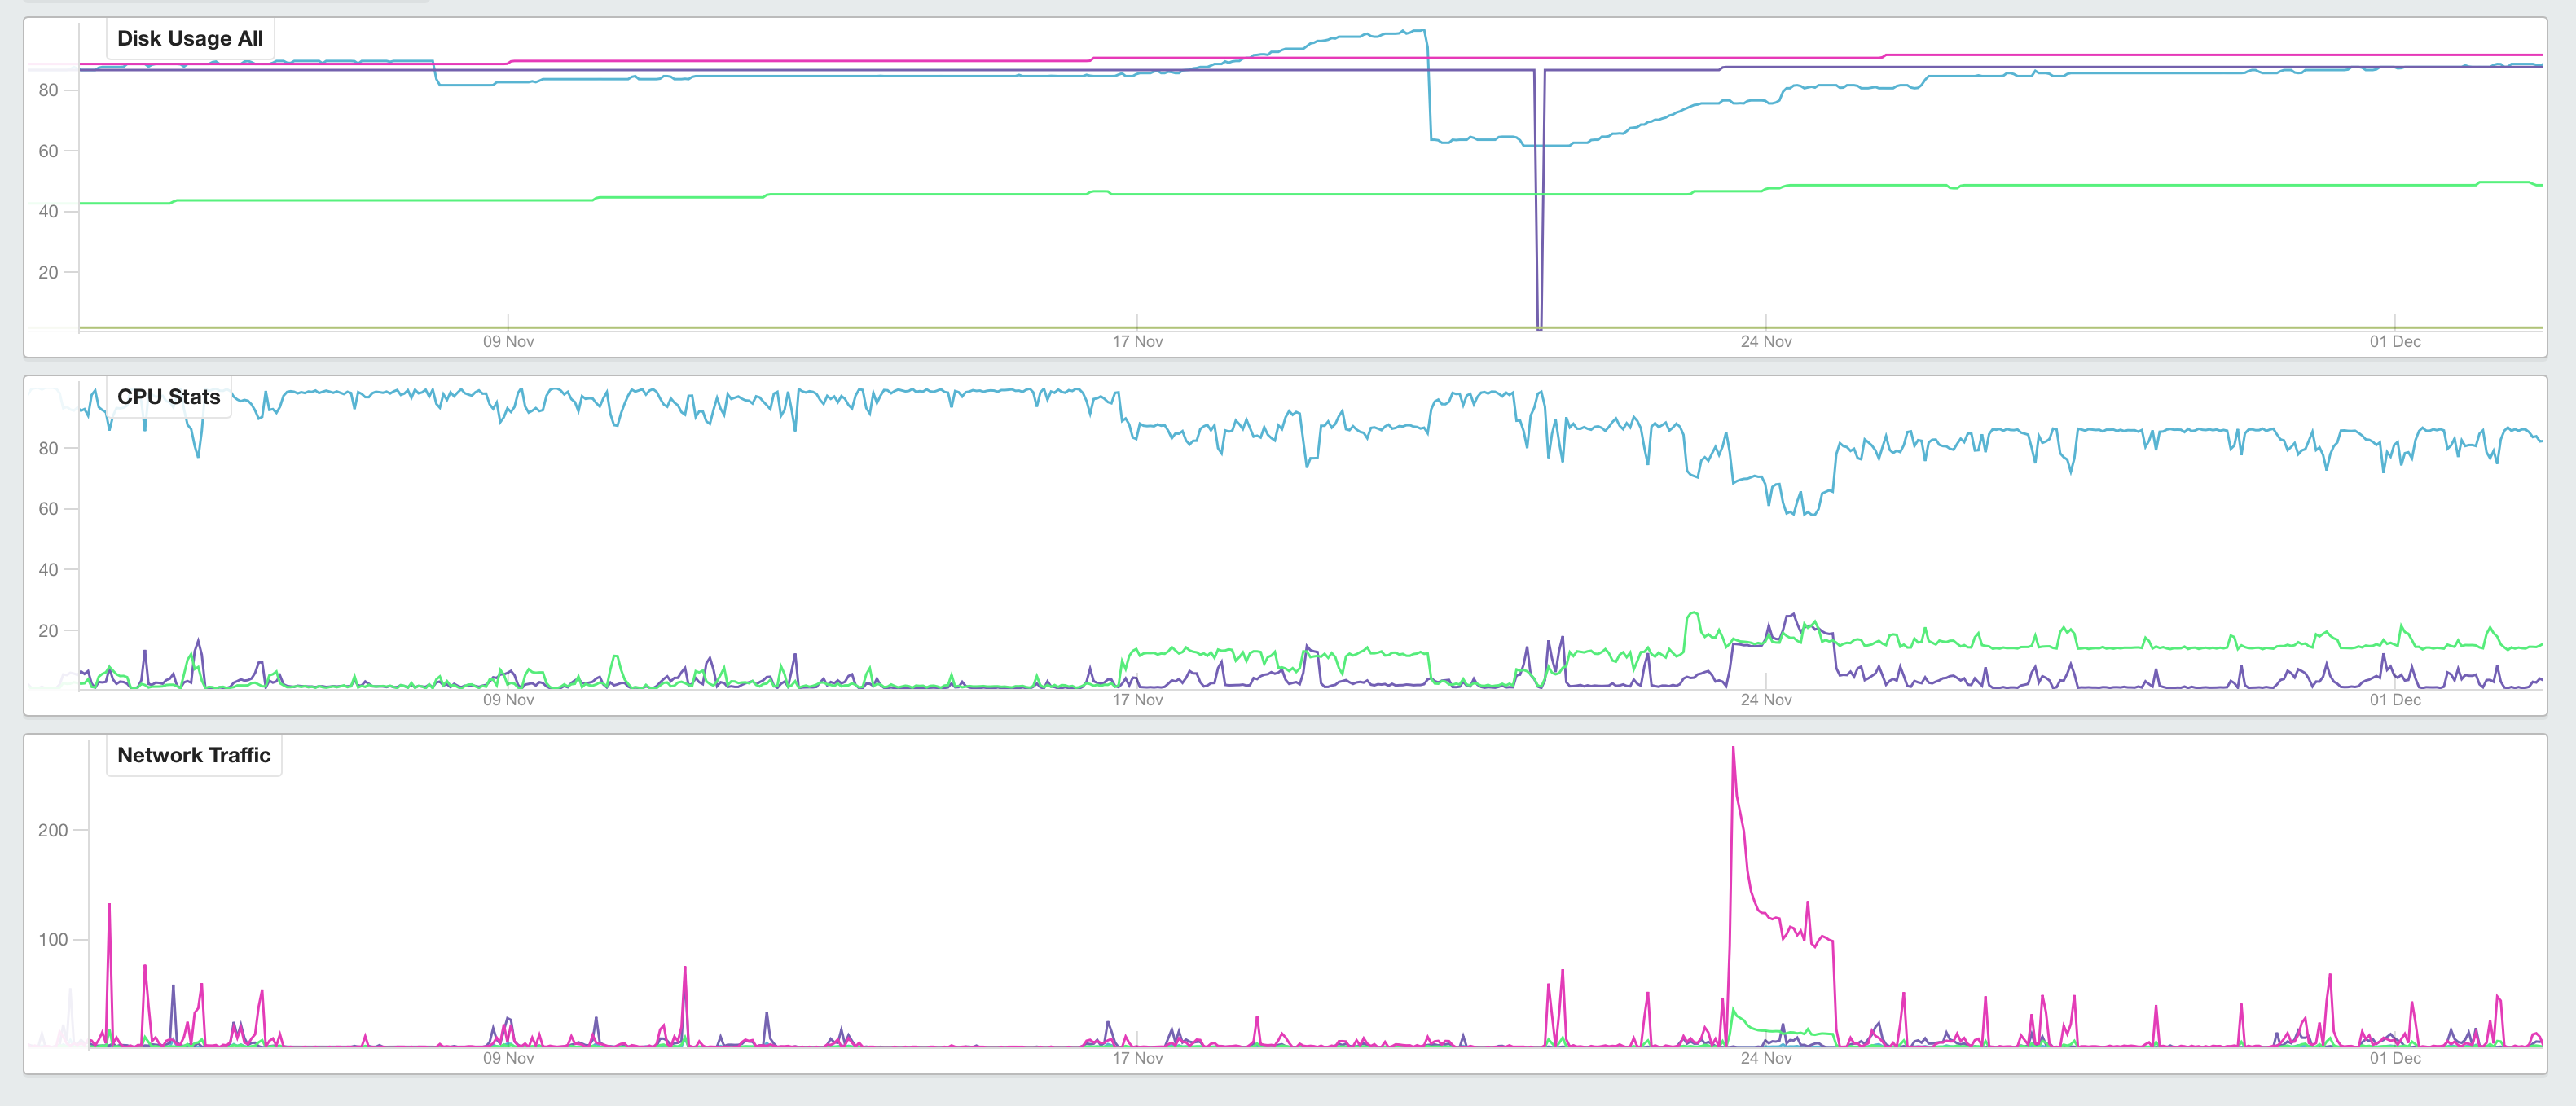
Finally a monitoring system that doesn’t make you dream in numbers. Server Density is an infrastructure monitoring system that lets us keep an eye on all our client’s infrastructure, spot trends and respond to errors before they’re reported.
We customised our installs for the specific data we needed to see, and the devices we use: Server Density were more than happy to help. We now have it integrated into Slack and Geckoboard so everyone knows whats going on.
When problems occur we don’t need to look at masses of useless stats to trying to solve the mysteries of the universe.
So next time your server’s hard drive only has 5% left or your internet goes down, we most likely have started work before you pick up the phone.
It is our great pleasure to welcome Kevin Mugadza to the team. Hi Kevin 👋
Kevin comes from a background designing and developing iOS solutions, primarily for the education market, and will be leading our efforts to bring our service to schools and colleges crying out for technology they actually want to use.
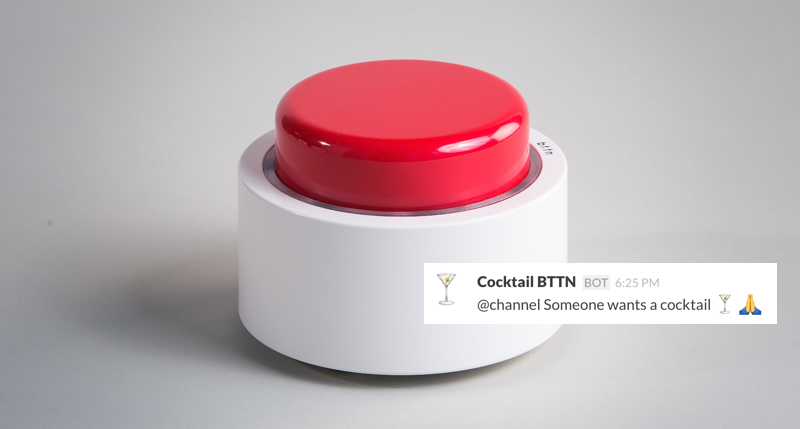
We’ve just invested in our very own bt.tn - billed as the simplest internet user interface in the world. It’s super cool: you connect it via WiFi (they also make one with a SIM card for mobile connection) and then tell it what you want it to do on my.bt.tn.
We’ve put it to great use a cocktail button, which connects into our #general Slack channel. Simply push the button when you’re in need of refreshment and hope someone gets up and makes you a cocktail.
Of course there are myriad other uses for it: we plan to set up a button at each of our clients offices for emergencies. Press the button and an urgent Zendesk ticket will be created: someone from your support team will call in minutes.
It’s our immense pleasure to welcome Steven to the LeftBrain team. Steven has over 8 years experience supporting Mac based businesses and comes to us from Apple.
He’ll be focussing on delivering an even better experience to our On Demand clients.
 There are three options for caching:
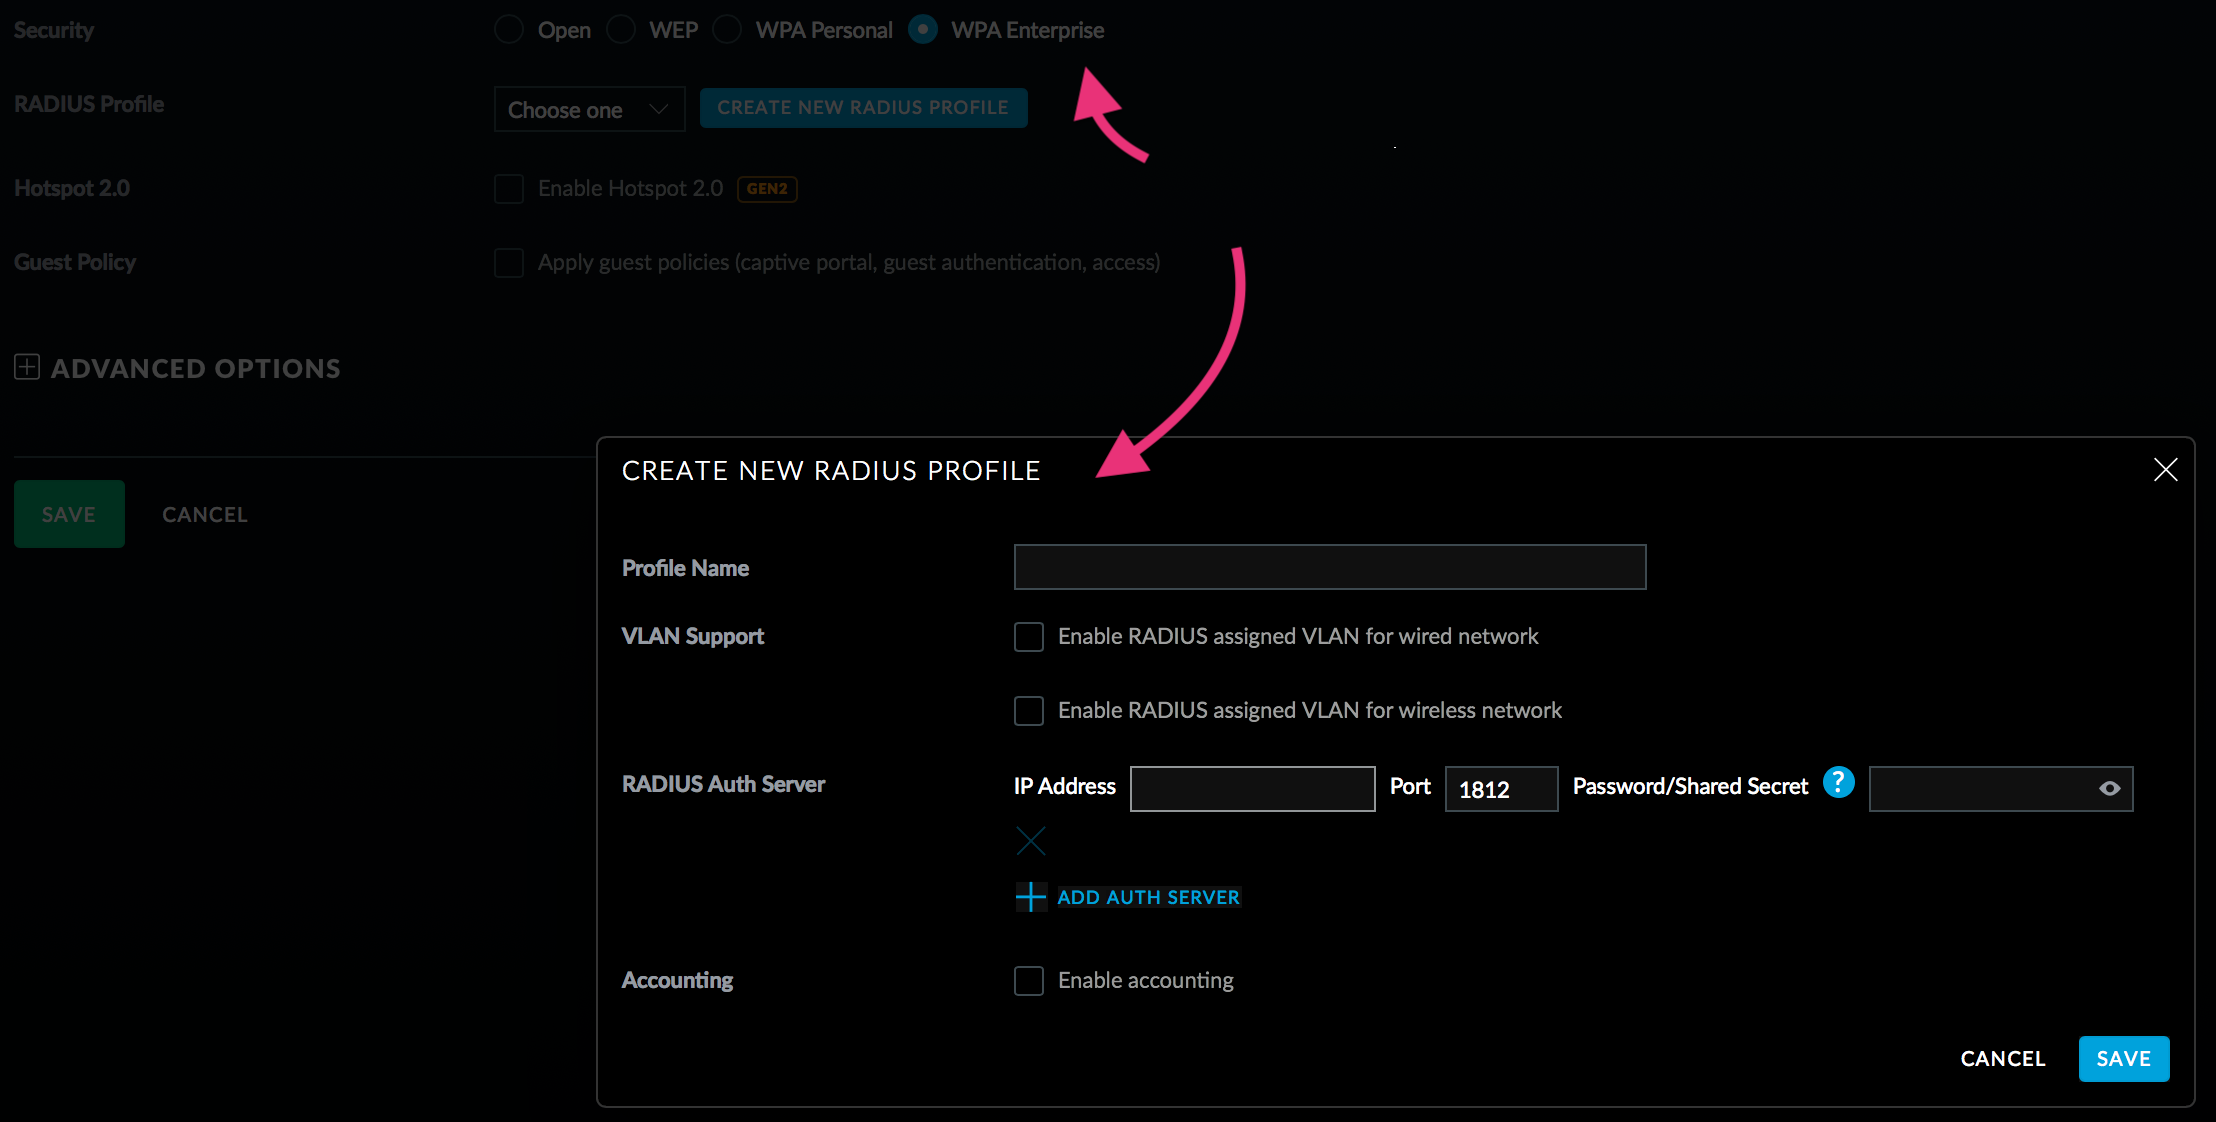 Within the UniFi controller, enabling RADIUS is as simple as turning it on and defining an authentication server.


%20Googlers%20in%20MTV(2).jpg)